- ROS2 Sign Recognition
- Table of Contents
- Overview
- Getting started
- How to use Gazebo simulation environment (optional)
- How to start the line following algorithm
- Save training images (optional)
- Neural network for sign recognition
- Pictures taken during the development process
- Video of the final result
- ROS2 packages used in the project
This is a ROS2 project for the Cognitive Robotics Laboratory course of the Mechatronics Engineering MSc of the Budapest University of Technology and Economics created by József Ferenczi, Mór Sas, Máté Horváth, Barnabás Szabó and Dániel Sándor.
The task is to simulate a robot with autonomous driving and additional capabilities of sign or pedestrian recognition.
-
Change directory to your
$USER's home folder and clone the repository:cd; git clone https://github.com/barnus877/ros2-sign-recognition;
-
To run the Gazebo simulation, paste the following code into the terminal:
cd ~/ros2-sign-recognition && colcon build && source install/setup.bash && ros2 launch sign_recognition_bringup world_teleopt.launch.py
-
To run the line following algorithm, paste the following code into a new terminal:
cd ~/ros2-sign-recognition && source install/setup.bash && ros2 run sign_recognition_py line_follower
-
To run the sign recognition node, paste the following code into a new terminal:
cd ~/ros2-sign-recognition && source install/setup.bash && ros2 run sign_recognition_py sign_recogniser
- Run the project.
- In Gazebo GUI click the 3 dots (
6) on the top right corner.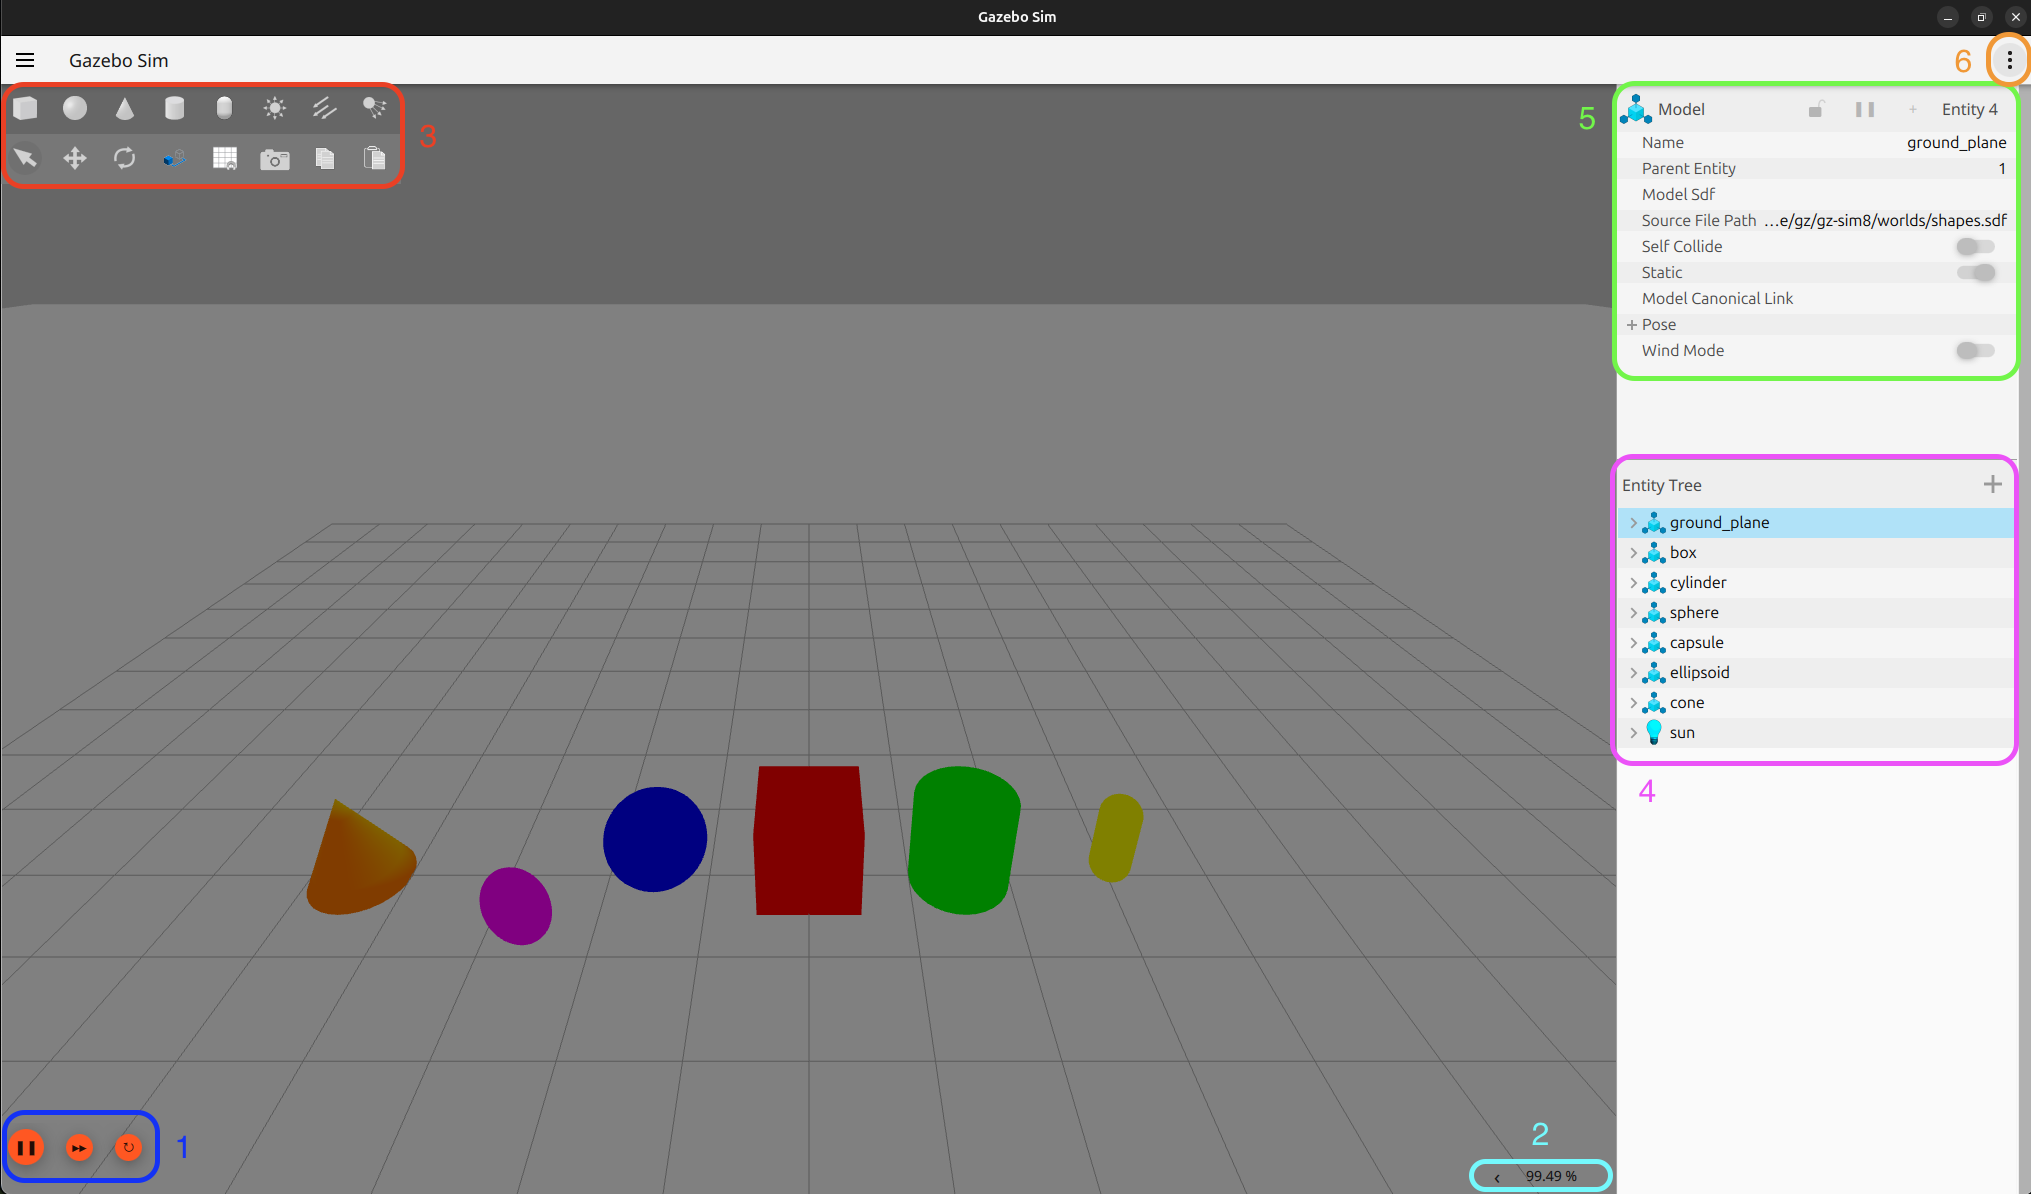
- Add models through the
Resource Spawnerwithin theplug-in browser. - Select folder:
~/ros2-sign-recognition/install/sign_recognition_bringup/share/sign_recognition_bringup/gazebo_models/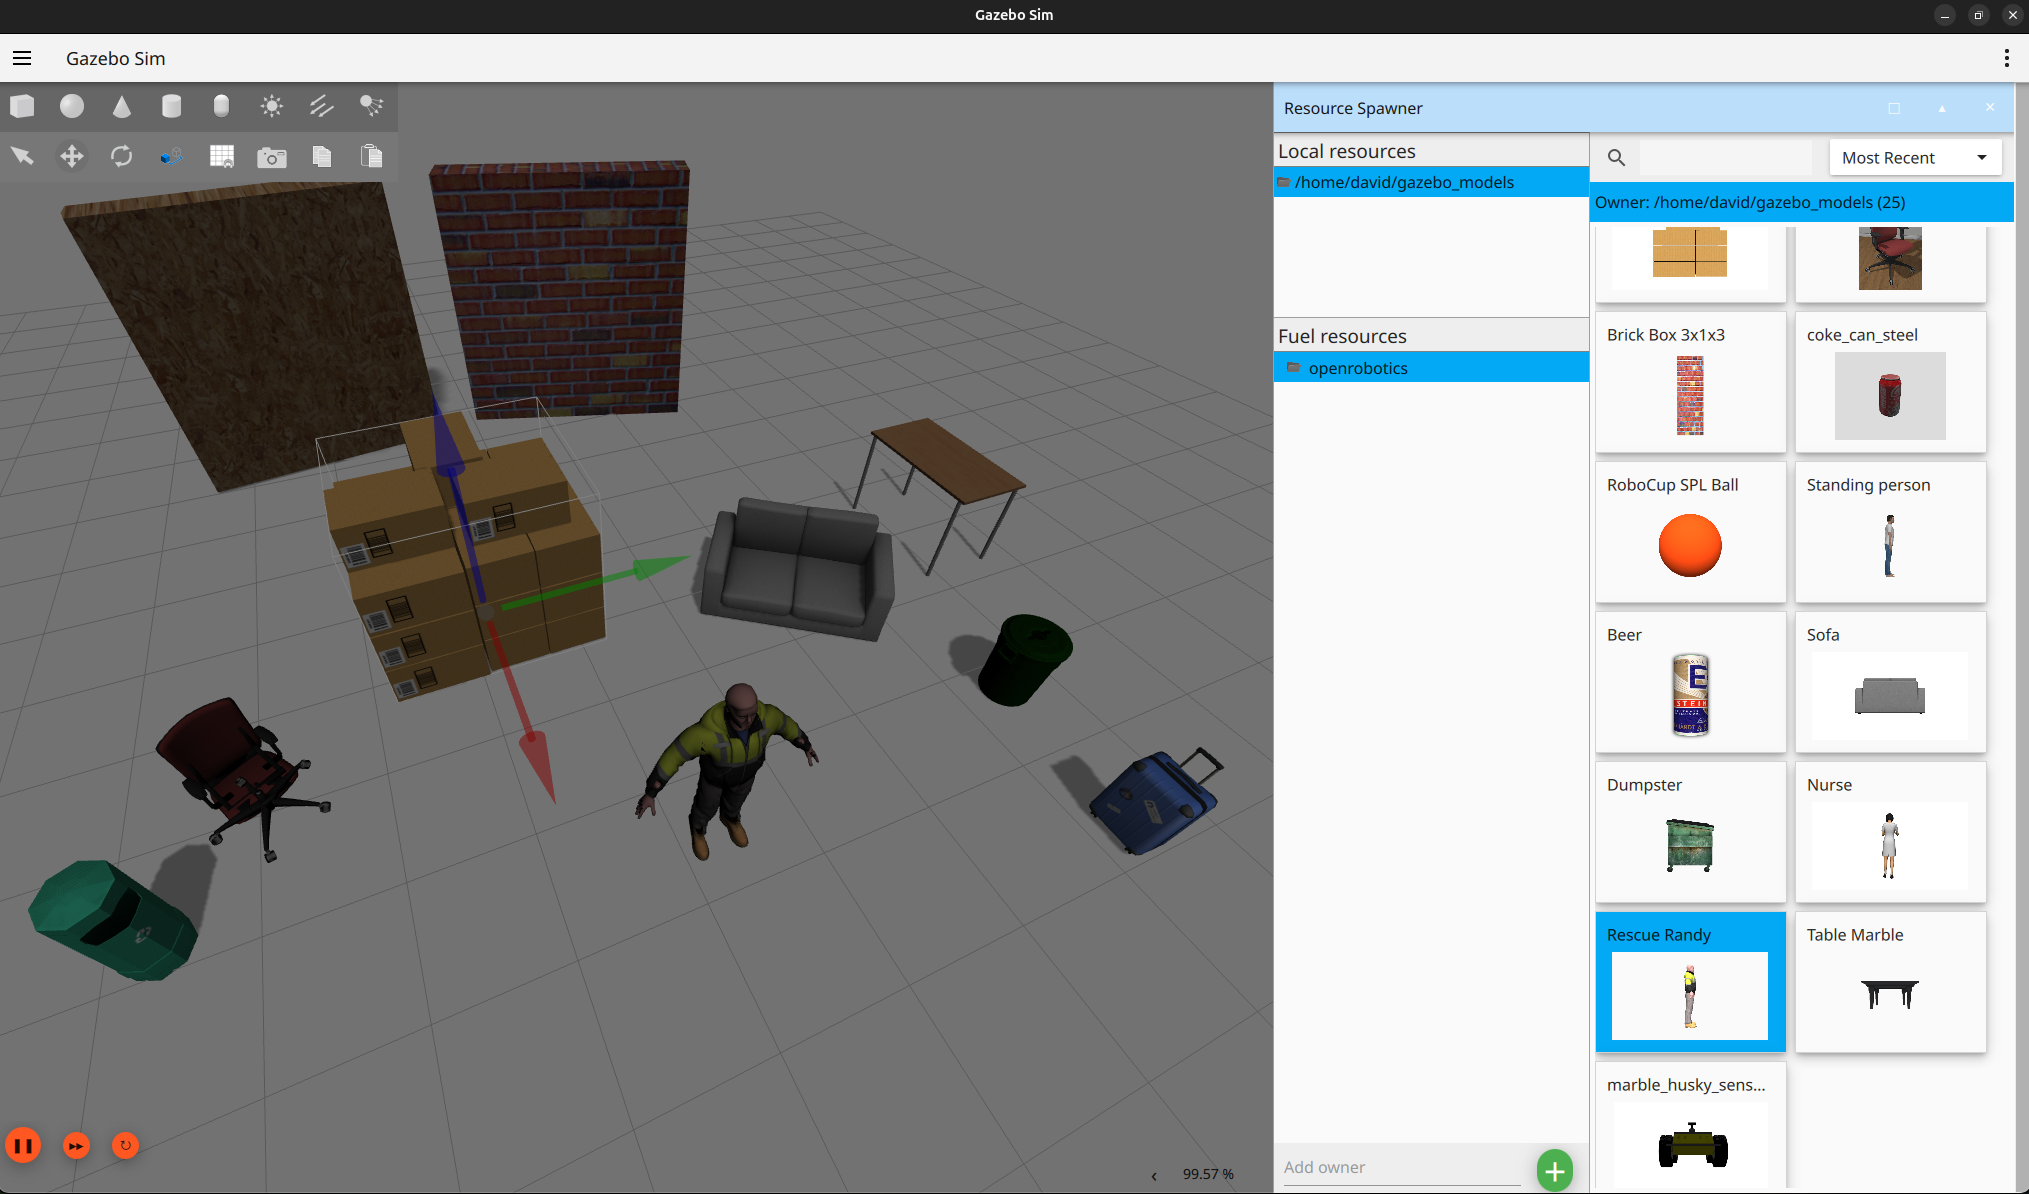
-
Replace all
file:///home/$USER/ros2-sign-recognition/install/sign_recognition_bringup/share/sign_recognition_bringup/gazebo_models/<include> <uri>file:///home/$USER/ros2-sign-recognition/install/sign_recognition_bringup/share/sign_recognition_bringup/gazebo_models/palya_mogi</uri> <name>palya</name> <pose>-1.2731360914953953 0.024185007175546058 0 0 0 0</pose> </include>
with relative path
model://<include> <uri>model://palya_mogi</uri> <name>palya</name> <pose>-1.2731360914953953 0.024185007175546058 0 0 0 0</pose> </include>
-
Delete
turtlebot3_burger<include> <uri>file:///home/$USER/ros2_ws/install/turtlebot3_gazebo/share/turtlebot3_gazebo/models/turtlebot3_burger</uri> <name>burger</name> <pose>4.1577145665028317 2.4008829921053554 0.010008771952750758 6.9807543737599483e-07 -0.012459121963041841 1. 3190277154170922</pose> </include>
In src/sign_recognition_bringup/launch/world_teleopt.launch.py update world_sign.sdf with the newly created .sdf file.
world_arg = DeclareLaunchArgument(
    'world', default_value='world_sign.sdf',
    description='Name of the Gazebo world file to load'
)-
Run the project according to the description above: Getting started
-
Paste the following code into a new terminal
cd ~/ros2-sign-recognition && source install/setup.bash && ros2 run sign_recognition_py line_follower
Run the save_training_images node that can save training images by pressing the s key, but before that, make sure that self.save_path is set to your own directory by changing $USER in the node:
class ImageSubscriber(Node):
    def __init__(self):
        super().__init__('image_subscriber')

        self.subscription = self.create_subscription(
            CompressedImage,
            'image_raw/compressed',  # Replace with your topic name
            self.image_callback,
            1  # Queue size of 1
        )

        self.save_path = "/home/$USER/ros2-sign-recognition/src/sign_recognition_py/saved_images/"
If the path is set up correctly we can build, source the project and run the node:
cd ~/ros2-sign-recognition && colcon build && source install/setup.bash && ros2 run sign_recognition_py save_training_imagesRun the manual teleoperation node:
ros2 run teleop_twist_keyboard teleop_twist_keyboardTo label the saved images we just simply have to copy the images to the suitable folder under the training_images folder. We distinguish 6 labels:
- Limit 5
- Limit 40
- Limit no
- Lived place
- No sign
- Stop
The sign_recognition_py package already has a trained network in the network_model folder that is ready to use. This model was trained using the following Tensorflow and Keras version:
Tensorflow version: 2.18.0
Keras version: 3.14.1
There is a simple python training script in the package, called train_network.py.
First, navigate to the right folder then run the script:
cd ~/ros2-sign-recognition/src/sign_recognition_py/sign_recognition_py/ && python train_network.pyLet's see the results:

# 1. cd into the project's root folder
cd ~/ros2-sign-recognition/

# 2. Install colcon into your active virtual environment
python3 -m pip install colcon-common-extensions

# 3. Clear out the old system-python-linked builds
rm -rf build/ install/ log/

# 4. Rebuild the workspace (now colcon will use your tf environment's Python)
colcon build --symlink-install

# 5. Source the built workspace
source install/setup.bashAfter rebuilding with colcon build, run:
cd ~/ros2-sign-recognition && source install/setup.bash && ros2 run sign_recognition_py sign_recogniserTo adjust the evaluation rate at runtime:
ros2 run sign_recognition_py sign_recogniser --ros-args -p eval_interval:=0.5-
First, we started with creating the map and adding the signs to it in Blender:

These are the sources for the road signs: Speed limit road signs wikipedia site and Road signs in Hungary wikipedia site

-
After that, we imported the map into Gazebo simulation:


-
Lastly, we trained the neural network for sign recognition and tested it in the simulation:


